

Create your first screening agent
Paste a job description, review the requirements the copilot drafts, pick a voice and screening mode, and launch an agent that scores every CV for the role.
A screening agent is RoundOne's setup for one role. It holds the requirements, decides what is checked on the CV and what is asked on the voice call, and prioritises candidates as they come in. Building one from a job description takes about five minutes, most of it reading the draft.
Before you begin
- A RoundOne account. Sign in or create one.
- The job description for the role. A detailed one gives a better draft: responsibilities, must-have and nice-to-have skills, location and level. This guide uses a Data Scientist role at a Lloyd's managing agent.
Nothing is saved until you launch
Everything on the build page stays editable, and the agent only exists once you click Launch. You can close the page at any point and nothing is created.
Steps
Open the agent builder
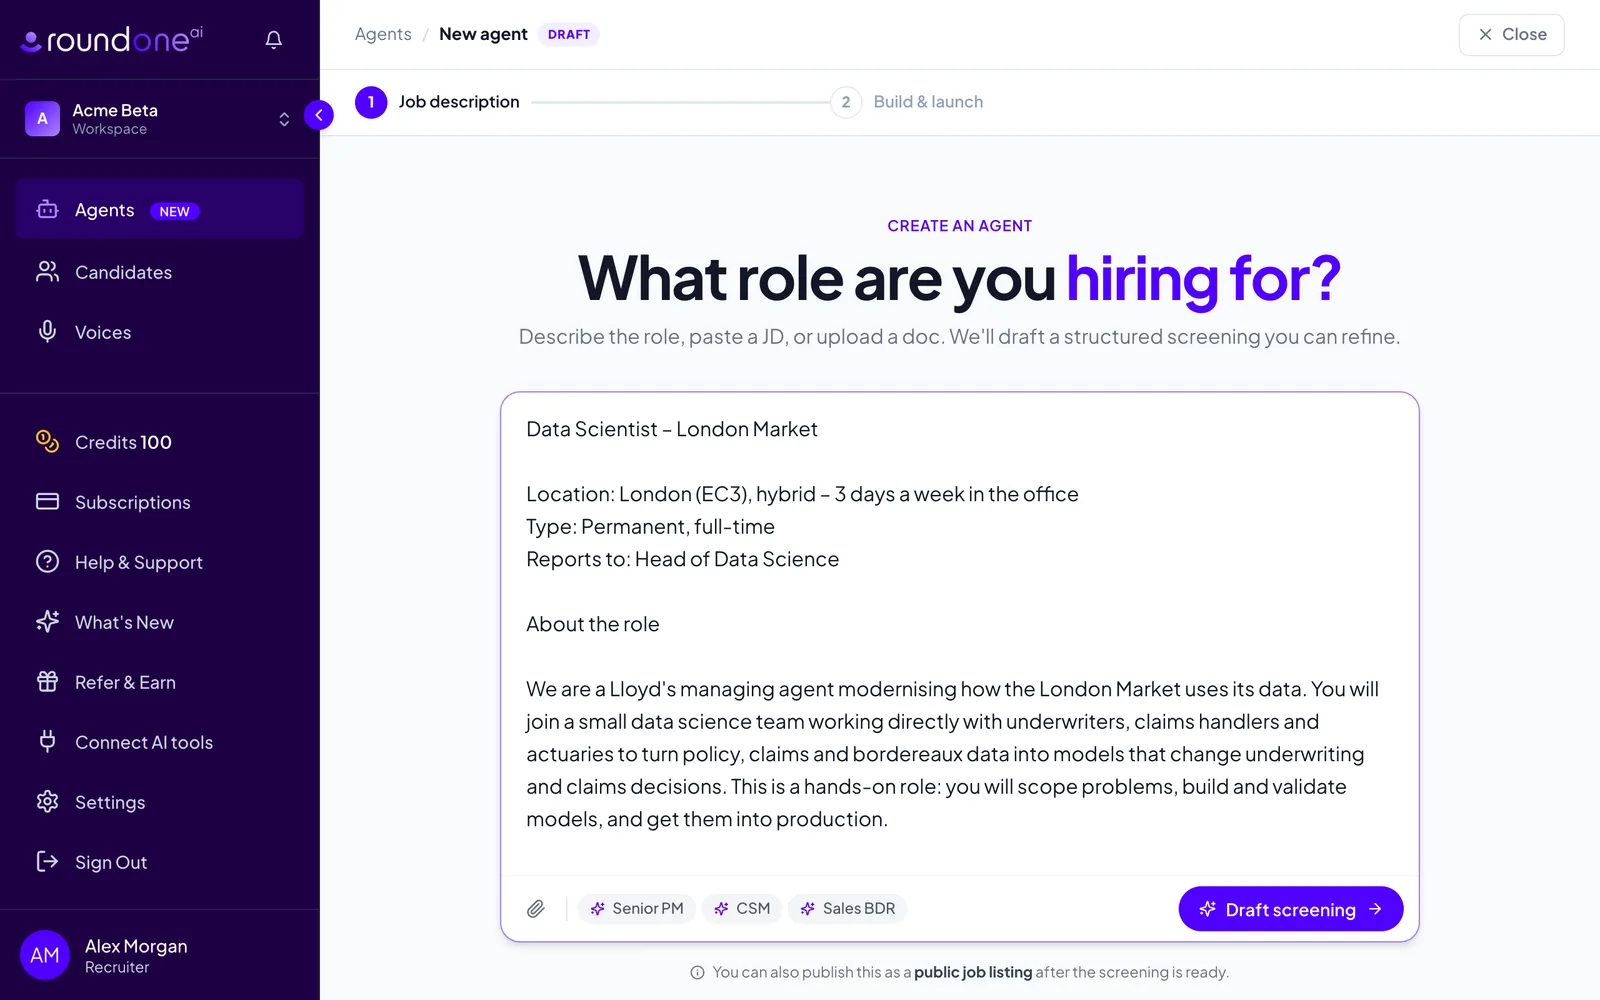
From the sidebar choose Agents, then click Create agent in the top right. You land on the page that asks What role are you hiring for?
Paste the job description into the text box. You can also attach a file with the paperclip (PDF, Word, text or Markdown), or click one of the sample roles under the box to try the builder with a ready-made description. Then click Draft screening.
Watch the copilot draft the requirements
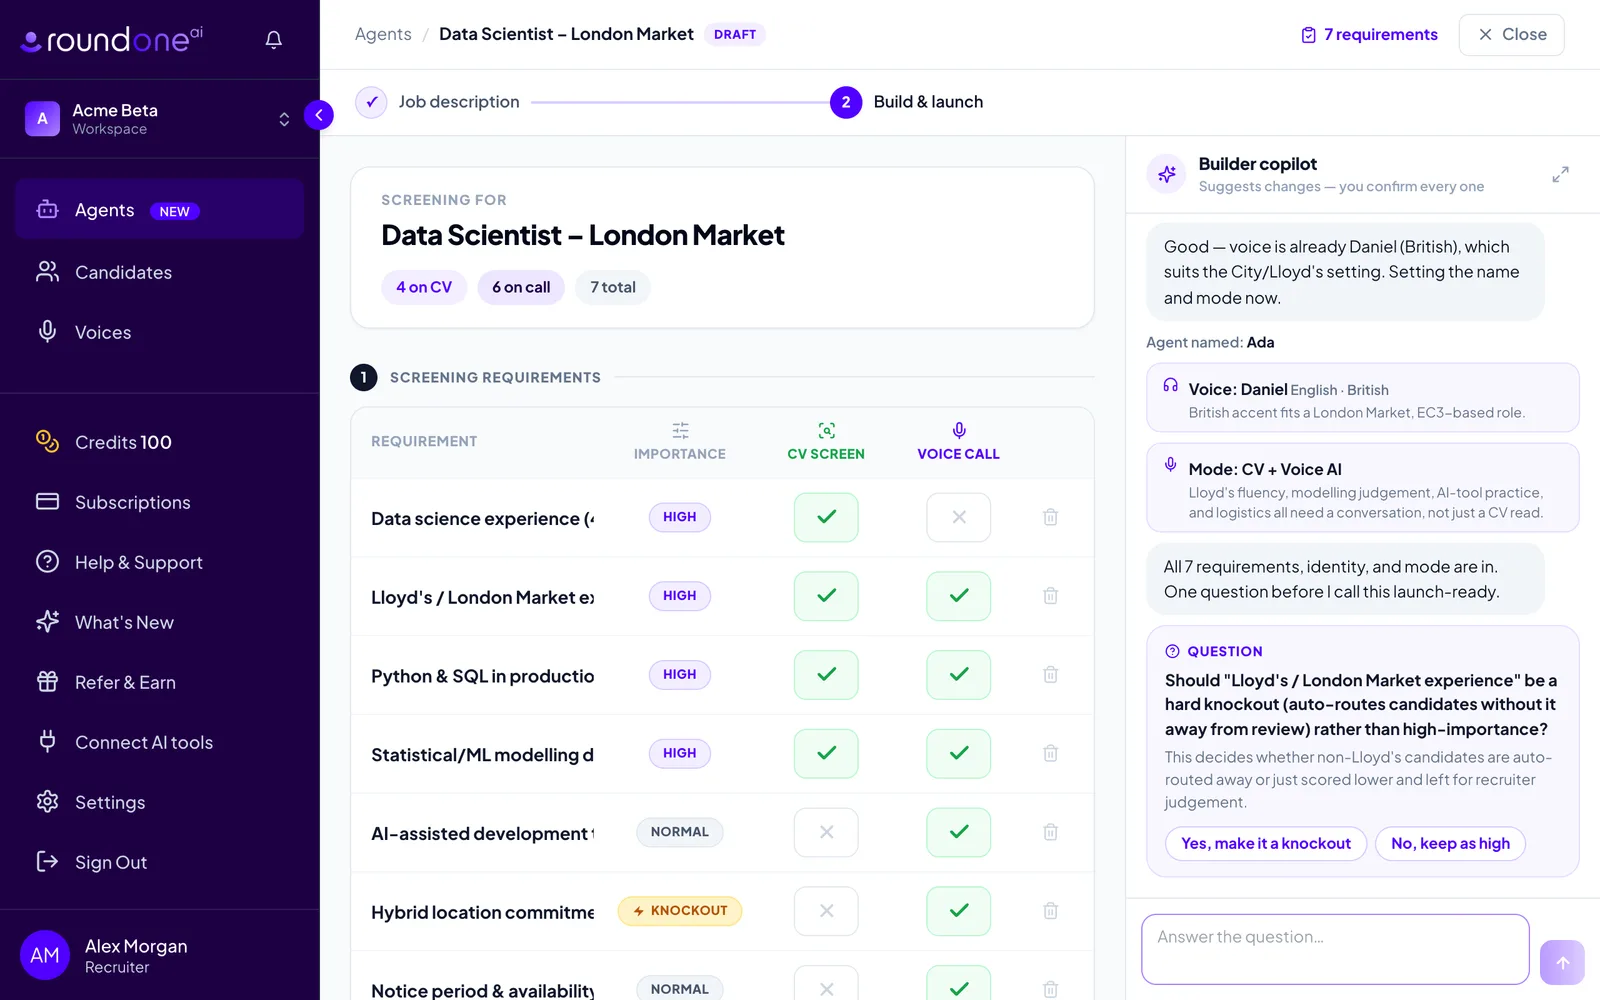
The Build & launch page opens with the requirements table empty, and the Builder copilot in the right-hand rail reads the description and fills the table one row at a time. While it works you see Thinking… in the rail and the requirement count in the top bar climbing.
Each requirement gets three settings:
- Importance: Normal, High or Knockout. Click the pill to cycle through them. Must-haves weigh three times a normal requirement in the score; knockouts also cap a candidate's score when the evidence is missing.
- CV screen: whether the requirement is checked against the CV. Green tick means yes.
- Voice call: whether the agent probes it on the voice screen.
The copilot also names the agent, picks a voice for the call, and sets the screening mode. Each of those appears as a small chip in the rail, and every one can be changed on the page.
The copilot may ask you a question or two before it calls the draft ready, for example whether a requirement should be a knockout, or whether the call should cover salary and right to work. Answer with one of the quick-reply buttons or type a reply.
Adjust the draft
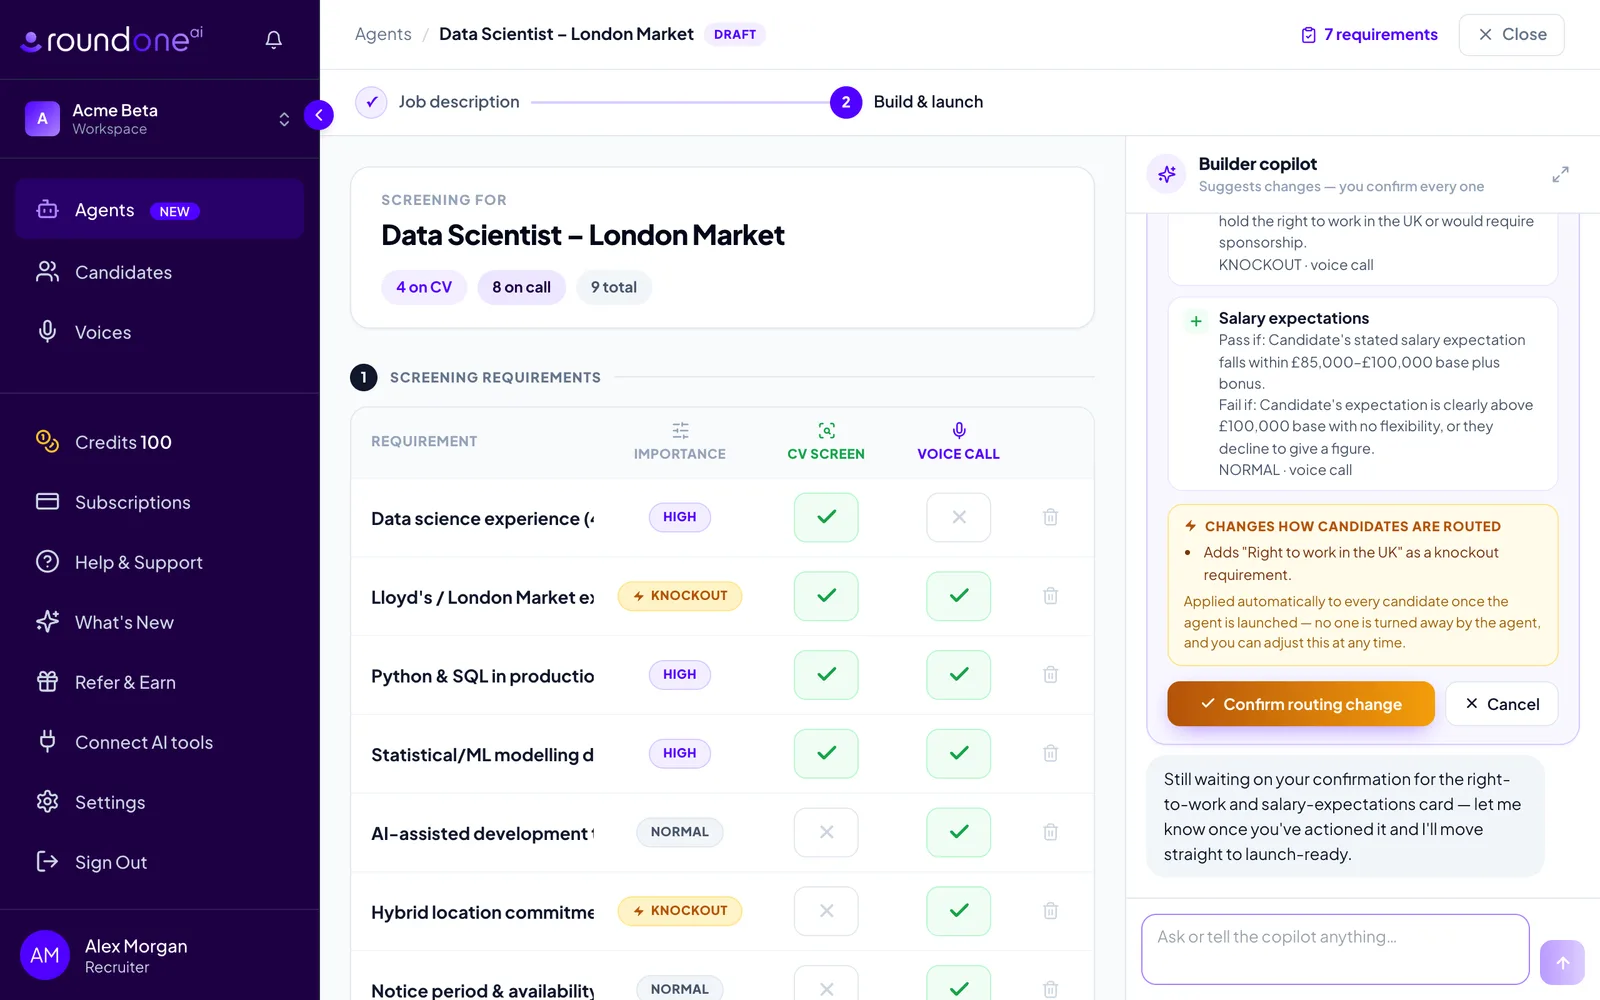
Change anything directly in the table: click a requirement to edit its wording, click the importance pill, toggle the CV and call columns, or use the bin icon to remove a row. Type in Add a requirement… and click Add to add your own.
You can also tell the copilot what to change, for example make right to work a knockout or raise AI tooling to high importance. It never edits the table on its own. Instead it shows a card marked Proposed change — not applied yet with the exact edit, and you click Confirm or Cancel. Changes that affect how candidates are routed, such as adding a knockout or changing auto-advance, are highlighted in amber and the button reads Confirm routing change.
While a proposal is waiting, the table is read-only and the launch button is disabled until you confirm or cancel it.
Name the agent and choose its voice
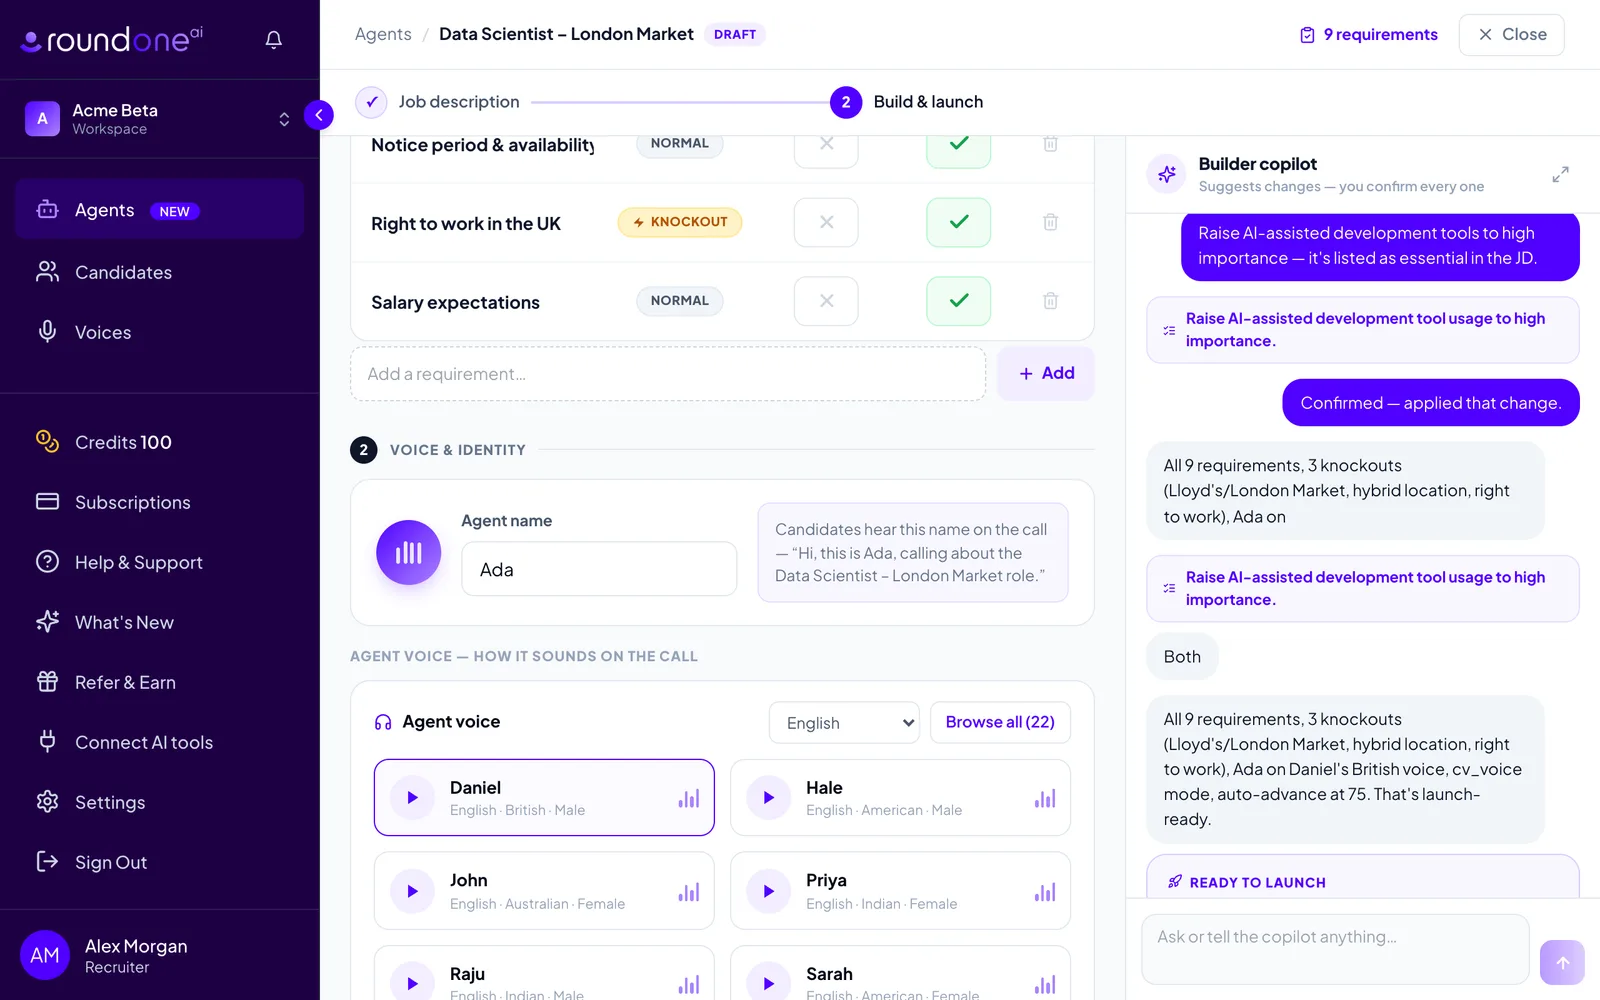
Scroll to Voice & identity. The Agent name is what candidates hear on the call, and the preview to the right shows the opening line. Change it if you like.
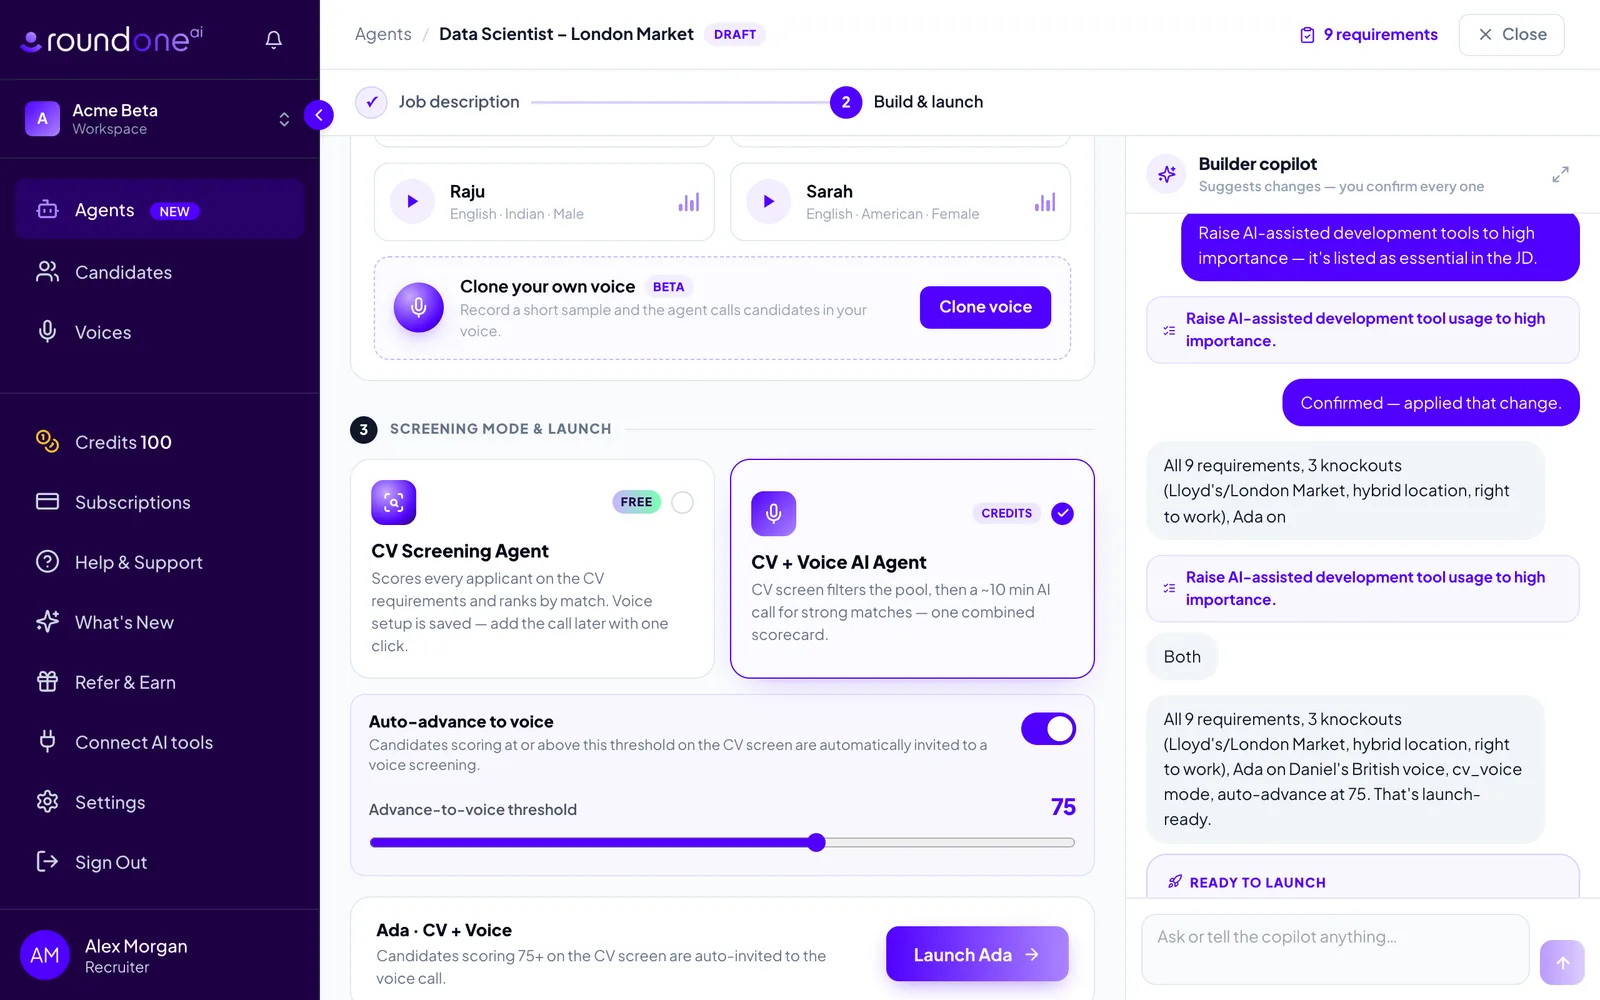
Under Agent voice, pick one of the voice tiles. Use the language dropdown to filter, press the play button on a tile to hear a sample, or click Browse all for the full catalogue. Clone your own voice lets you record a short sample so the agent calls in your voice.
When the draft is complete the copilot posts a Ready to launch card summarising the setup. You can launch from that card or from the bottom of the page.
Choose the screening mode
Under Screening mode & launch, pick how candidates are screened:
- CV Screening Agent: free and unlimited. Every candidate is scored on the CV requirements and ranked by match. The voice setup is saved so you can add the call later.
- CV + Voice AI Agent: the CV screen filters the pool, then strong matches take an AI voice call. Voice screens use credits, which come with a paid plan or the free trial.
With CV + Voice selected, the Auto-advance to voice card appears. Leave it on and candidates scoring at or above the Advance-to-voice threshold on the CV screen are invited to the call automatically. Drag the slider to move the bar. Turn it off and every candidate is held for you to invite by hand.
Launch
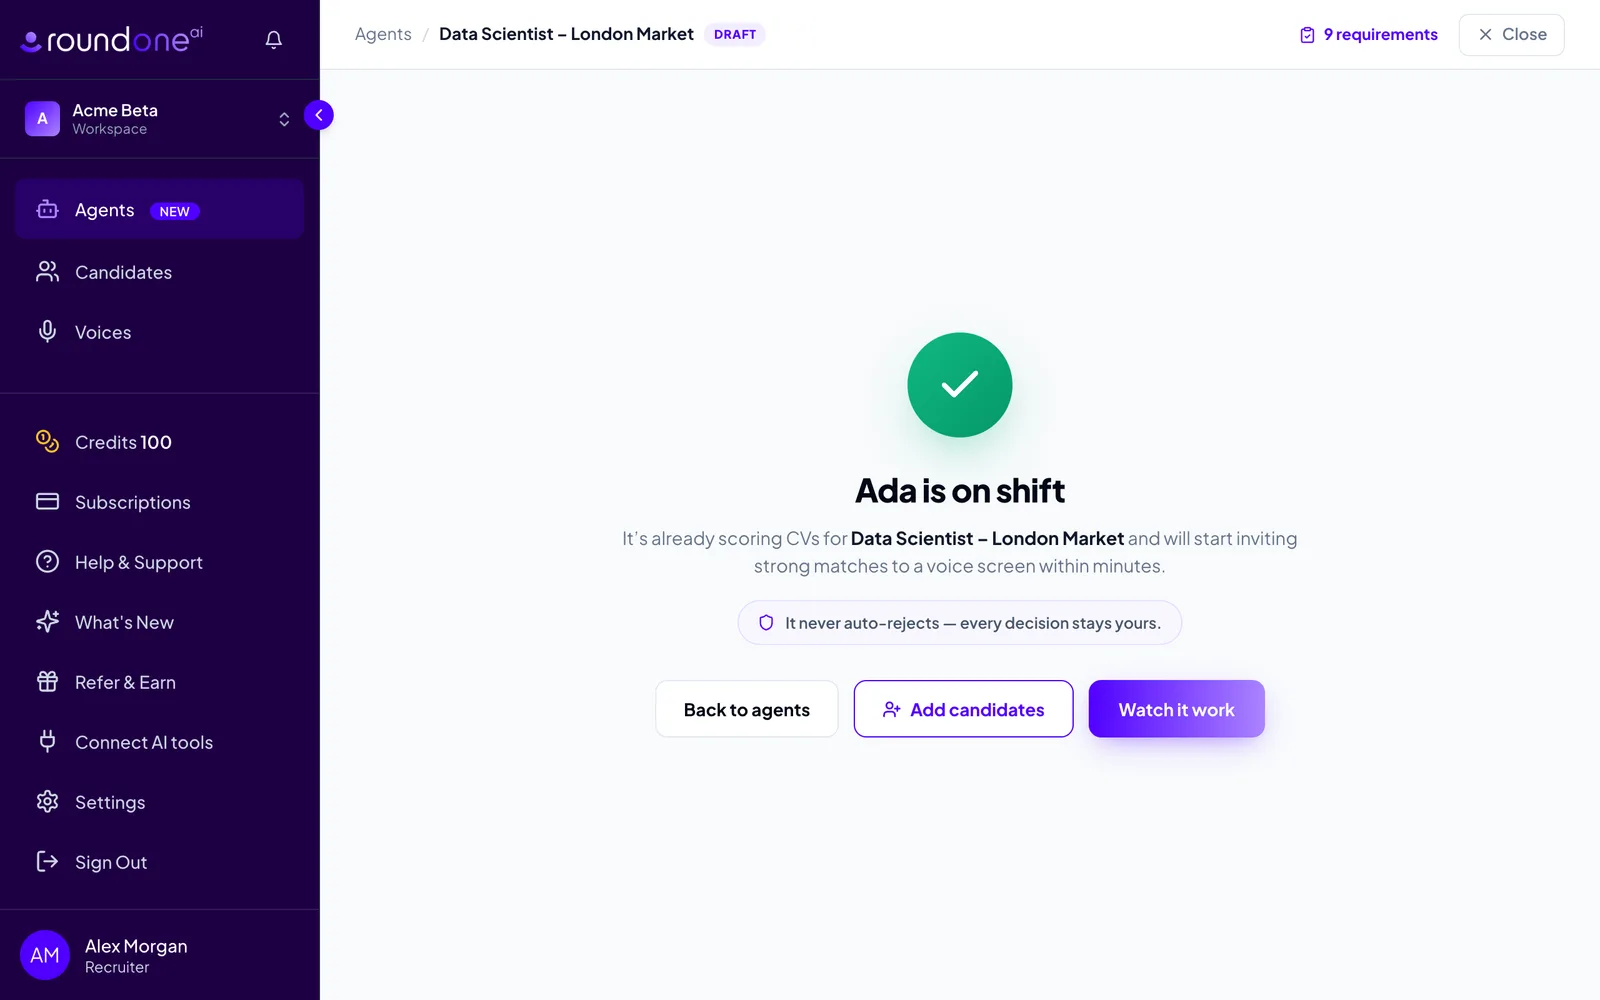
Click Launch followed by the agent's name, for example Launch Ada. The confirmation screen tells you the agent is on shift and reminds you that it never auto-rejects: every decision stays yours.
From here, Add candidates opens the CV upload straight away, Watch it work opens the agent's pipeline, and Back to agents returns to your list.
What you see next
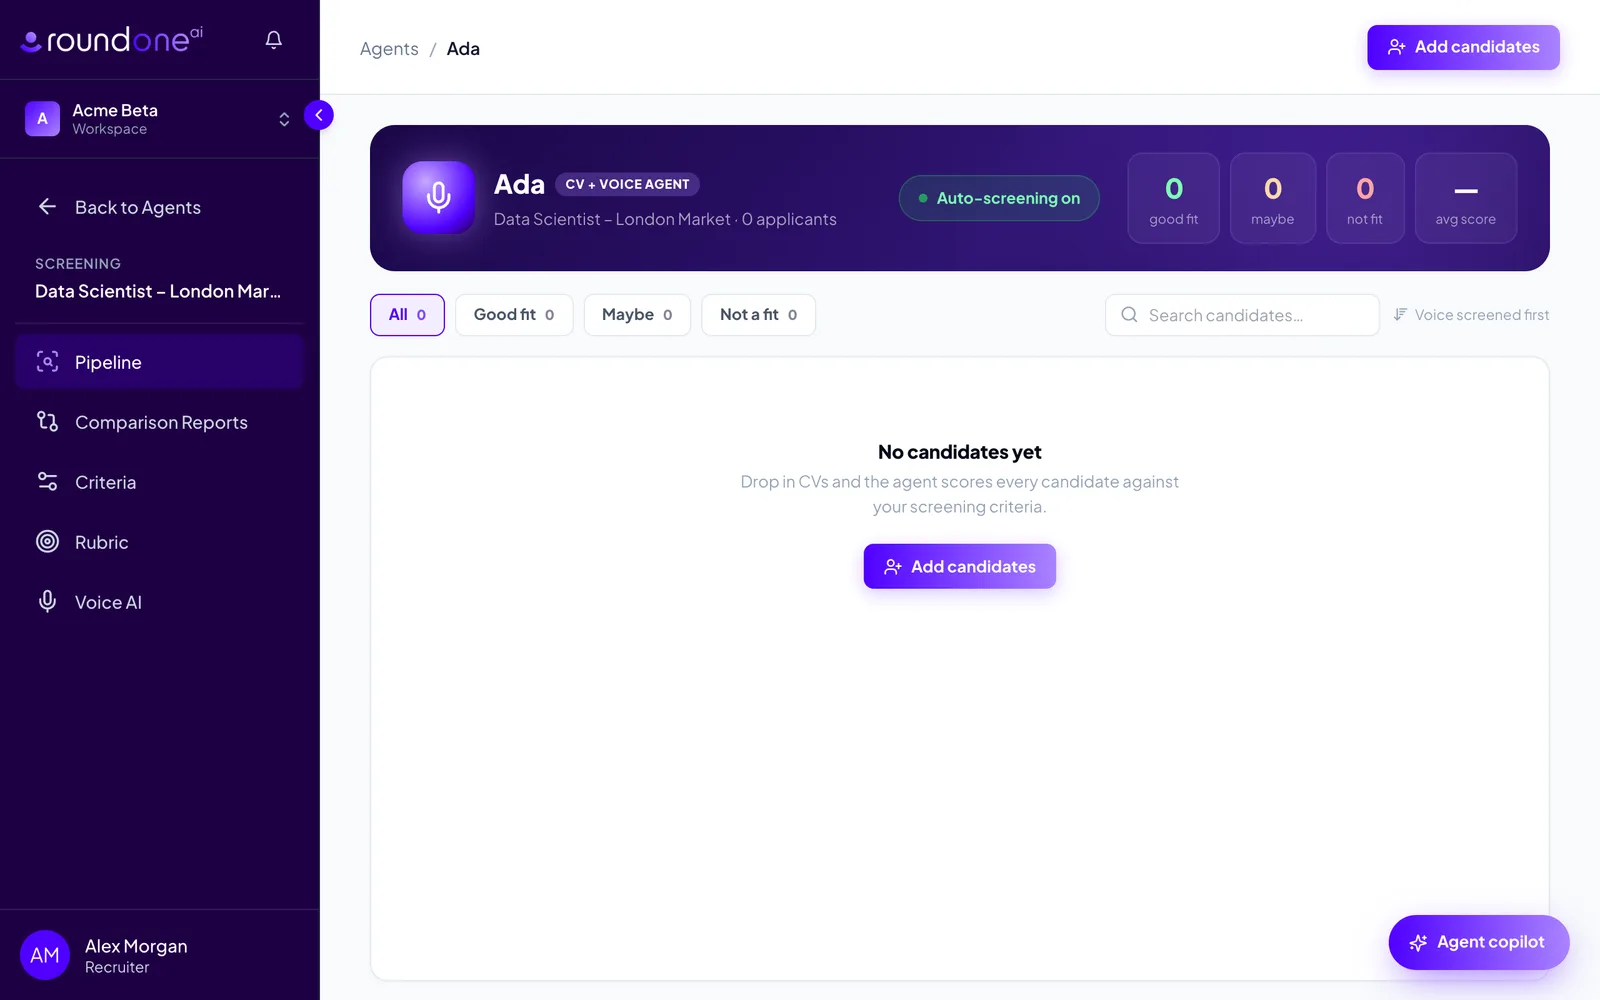
Watch it work opens the agent's Pipeline. The banner shows the agent's name and mode, an Auto-screening on status, and counters for good fit, maybe, not fit and average score. The agent's own menu in the sidebar gives you Pipeline, Comparison Reports, Criteria, Rubric and Voice AI.
The pipeline is empty until you add candidates. Next: Add candidates by uploading CVs.
Editing a live agent
Requirements, knockouts and auto-advance can be changed after launch from the agent's Criteria page, or by asking the Agent copilot on the pipeline page. Existing candidates keep their scores until you rescreen them.
Troubleshooting
- The launch button says "Start FREE 14-day trial". Your workspace has no active plan yet and you chose CV + Voice. Click it to start the trial, which needs no card, or switch to CV Screening Agent, which is free and never asks for a plan.
- The launch button is disabled. Check the note under it. Usually a copilot proposal is waiting for Confirm or Cancel, or the table has no requirements.
- The copilot stopped with an error. Click the rail's input and send your last message again. Nothing on the page is lost.
- A requirement's wording is cut off in the table. Click the text to see and edit the full wording. Widen the browser window or drag the copilot rail narrower to see more.